
1.Ivor ERP for retail
- General goods retailing such as convenience store, fashion shop
- Services involve mobile phone repairs, shoe repairs, dry-wash or business that requires customer to collect the goods upon the second visits
- Services only business (consultant, tradesman)
1.1.Getting started
Once you have finished the sign-up process, you will receive an email notifying you that the system is ready in about 5-10 minutes.
Note: Please check your spam folder as well.
Ivor Software will need to know more information about your business before we can continue, therefore upon your first login, Ivor ERP will take you to the Wizard, asking you to complete all the information required, including:
Business Name
Address
Region/Country
Tax/GST Number
We have published a video here so that you can follow and set up your system easily with us:
1.2.Products
In this section, we are going discuss how you manage products, stock inventory, create purchase orders, transfer stock between stores.
1.2.1.Add or edit product details
To add a new product, you may go to:
Products -> Add new product
Inventory mode*
This is how you want Ivor ERP to manage your stock inventory.
Use weight scale
Indicate if you wish to connect to the weight scale to adjust the order quantity as you scan the product.
Status
Setting this to active will enable the products in Ivor ERP or else the product entry will be ignored.
Free shipping eligibility
Indicate if you allow this product to participate the promotion for free shipping based on order amount. You may set up the free shipping promotions at Shipping -> Free Shipping Eligibility.
Custom price
Indicate you wish the POS system to pop up the price entry screen for you to update the product price as you scan or select the barcode. This is generally good for products that you wish to enter the unit price every time you make a sale.
Product code*
This is the PLU code (also called a short code for the product). In some cases, product code and barcode can be the same.
Product name*
This is the name you define for your product.
Website display name*
This is the name you define for your product when it displays on your website.
Sub title
Sub title you use to display the product on your website. Not supported for all website themes.
POS short name
If this is defined, the POS systems’s product selection menu will display the short name instead of the product image.
Short description
Short description you use to display on the product on your website. Not supported for all website themes.
Meta description
Meta description tag for SEO purpose.
Meta keyword
Meta keyword tag for SEO purpose.
Description
Description of your product. The content will display on the main description area on your product details page.
Category
Define which category the product belongs to. Categories are used for POS and website and they are multiple levels. You may also assign one product to multiple categories at the same time. For example, a men’s top can be assigned to Men’s Fashion but also Sportswear at the same time.
Brand
The brand of the product that belongs to.
Restricted to shipping
Restrict the shipping methods that can be used for the product. If this is set, when a customer makes a purchase for this product, the shipping methods not allowed for this product will be hidden. If multiple products are purchased, the customers can only see shipping methods available for all products at the same time. If there is no such shipping method available for all products purchased, the system will display no shipping method. On the website, it will displays “No available shipping methods, please contact Customer Service”.
Department
The department that the product belongs to. Department is used for data statics purpose for reports or for setting up promotion targeting certain set of products. Unlike categories, eac product can only be assigned one department only.
Gift voucher giveaway
You may assign the product to the Gift voucher giveaway group at Payments -> Vouchers -> Giveaway on spending. Please refer to the Voucher section to see its usage.
Product weight policy
You may assign the product to a special weight policy. The weight policy may define how you calculate the product’s weight when customers are buying multiple quantity of the products assigned to the same special weight policy.
Weight
The weight of the product. Used for calculating shipping cost.
Length/Width/Height
The dimension of the product. Used for calculating shipping cost.
Quantity
The product overall available quantity across all stores (read only). If you wish to update the quantity, click on the above Stock or Variant tab to adjust them.
Agent Commission
Indicate whether or now allow agent to earn commission of such product.
Low Stock Alert Quantity
The quantity met to trigger low stock level alerts. If the alert is on, the product row will be highlighted in red from Products -> List Of Products section.
Max Quantity Per Order
The maximum quantity per order allowed.
Expiry Date
Expiry date of the product. At the moment, Ivor ERP only supports single entry of expiry date. Multiple batches of products should use the earliest expiry date.
Latest Cost
The latest cost of the product excluding any tax. You may update this entry but as you confirm a purchase order, the latest cost gets updated again automatically.
Average Cost
The average cost of the product excluding any tax. You may update this entry but as you confirm a purchase order, the latest cost gets updated again automatically.
Supplier
The default supplier pre-selected as you create a purchase order. You may change it at the Purchase Order section too.
Default Purchase Qty
The default purchase quantity as you create a purchase order.
Supplier Stock Ratio
Stock ratio means you may stock in the multiple times of the supplier order’s product quantity. For example, one box of beers may container 12 individual bottles.
Maintenance Qty
If maintenance quantity is set above zero, you may create a purchase list from Products -> Purchases -> Purchase List automatically using to maintain the Maintenance Quantity required for each store.
New Supplier Product Barcode
Product barcode used your supplier (if different).
Standard Pricing
The standard selling price of the product.
1.2.2.Website store
You may update website store setting for an individual product from
Products -> List Of Products -> select a product to modify -> Website Store tab.
Description template (or other content template)
If this is set, the content of the template will append to the Product Description. Therefore you do not have to enter Product Description every time.
Javascript template
If this is set, the javascript will append to the product details page (requires website template to support).
Featured
Setting this to ‘yes’ will assign the product to the featured / top seller section on your website (may vary according to different website templates).
Special
Setting this to ‘yes’ will assign the product to the special / promotion section on your website (may vary according to different website templates).
Flash sales
Setting this to ‘yes’ will assign the product to the flash sales section (requires plugin to support)
Popularity
The higher the popularity is set, the product will display first if they are at the same Sort Order setting.
Related products
Related products will normally display at the product details page or prior to customer checkouts (may vary according to different website templates).
Add-on products
Add-on products will normally display at the time the customer attempts to add a product to the shopping cart. For example, product extended warrant (must require special template to support).
Not for sales
By default, the product will be available on the website. You may choose to hide the product from the website and make it only available from the offline POS system.
Searchable
Indicates whether or not allow the product to appear from the website searches.
Delivery required
Indicates whether or not the product requires deliveries (normally virtual products do not require physical deliveries).
Allow to purchase by reward points
Enter product points allowed to purchase the product instead of cash payments (must require special template to support).
Overselling quantity allowed
If this set above zero, Ivor ERP website will allow the product overselling up to the quantity entered.
Sort order
The less the number is set, the product will display at an earlier position. This is at a higher priority than the popularity setting. You may also set this from Content Management -> Product Sorting.
1.2.3.Customer group pricing
You may set product selling prices depending customer group, from
Products -> List Of Products -> select a product to modify -> Price+/- tab
- To assign customer group product. You must have created a customer group from Customer -> Customer Groups.
- Select a customer group and then enter Either the selling price or the price adjustment value
Please note that Ivor ERP record the adjustment value. So that if you change the product price, the customer group price will be adjusted according too.
For example, if a product is selling $100 to standard customers and $80 to wholesale group customers. Ivor ERP records the adjustment value $20. If you change the standard price to $105 one day, the whole group price will then be $85.
1.2.4.Time-based price
You may add time-based price from Products -> List Of Products-> select a product to modify -> click on Time-based price tab.
Time-based prices dynamically change product price based on the day or time as you set.
Product time-based overridden price will not override any discount/bundle/promotion settings but only pass a difference price to the POS system or the website etc. The discount you set remains operational as time-based price is executed.
For example, a product selling for $100 and time-based price set at 4pm to 11pm daily for $80 with 20% discounts in place. A customers who purchases it at 1pm will pay $80 or $64 if they purchase it at 5pm.
You may define name, currency, new price, store outlets, customer groups, date start and end to activate the time-based price.
If “Ignore Group Adjustment” is set to “yes”, the customer group price adjustment will be ignored.
1.2.5.Discounts
You add, remove, disable or enable single product discount from
Products-> List Of Products -> select a product to modify -> Discounts tab
At the time you add a product discount, there a few things to note:
- Discount name, discount type, discount percentage or amount, quantity required, currency, store outlets, customer groups, date start and end are mandatory to activate a product discount.
- If quantity required is set above one, the discount will be only activated when multiple products are ordered.
- Quantity required can be nested. For example, you may define 10% off for the first product ordered and then 20% off for 2 products ordered.
The single product discount will override the other store promotional discounts. (Both discounts will not appear at the same time).
1.2.6.Bundles
You add, remove, disable or enable single product bundle discount from
Products-> List Of Products -> select a product to modify -> Bundles tab
At the time you add a product discount, there a few things to note bundle product, discount name, discount amount, currency, store outlets, customer groups, date start and end are mandatory to activate a product discount.
The product bundle discount will override the single product discount and other store promotional discounts.
(The overridden discounts will not appear at the same time)
1.2.7.Stock management
There are 3 ways to adjust your product stock inventory:
- Manual adjustment: For general products, you may go to Products -> List Of Products -> select a product to modify -> Stock tab -> click on any warehouse name to adjust stock inventory. For products with variants, you may go to Products -> List Of Products -> select a product to modify -> Variants tab -> click on any product variant to adjust stock.
- Purchase order: Product quantity can be adjusted automatically when you confirm a product purchase order from Products -> Purchases -> Purchase Orders -> Add new purchase order.
- Stocktake: Product quantity can be adjusted as you confirm a stocktake from Products -> Stocktakes -> Stocktakes -> Add new stocktake.
- CSV Import: You may adjust stock inventory through CSV batch updates from Products -> CSV Import/Export -> Import Products.
1.2.8.Images
There are various places that you may upload image to a product:
- Product main image can be uploaded from Products -> List Of Products -> select a product to modify -> Image tab -> Upload. The product main image will be used on the POS system and the website’s product listing page, as well as display as the default image on the product details page.
- Other product images can be uploaded from Products -> List Of Products -> select a product to modify -> Image tab -> +More -> Product Images tab -> Upload Image.
- Images in the product description area. You may add product image to the product description area from Products -> List Of Products -> select a product to modify -> Details tab -> scroll down to the Description area and click on the Image icon
 .
.
1.2.9.Departments
Product departments are used for statistics purpose as well as promotion conditions or voucher use conditions.
You may add a department from Products -> Departments -> Add new department.
Product department can be assigned from Products -> List Of Products -> select a product to modify -> Under the Details tab, update product department entry.
1.2.10.Categories
Product categories are multiple levels:
- One product can be assigned to multiple categories.
- Category can be assigned to a parent category.
Product categories will be used on the POS item menu as well as on the website’s categories menu.
Product categories has nothing do with sales statistics. Sales statistics use Product’s Department entry.
1.2.10.1.Category Images
You may upload various images to a product category you define from Products -> Categories -> select a category to modify:
- Category Image
- Category Banner
- Category Icon
These images will be used on the website templates and display at certain areas.
1.2.11.Brands
1.2.11.1.Brand Image
You may upload the brand image from
Products -> Brands -> select a brand to modify -> Image tab
Products -> Brands -> select a brand to modify -> Slider Image tab
Where these images display (or whether they display) depends on the website template.
1.2.12.Currencies
You may choose multiple currencies in Ivor ERP.
Ivor ERP may have up to 6 price entries of different currencies.
You may adjust product currencies from Products -> Currencies. If you can not find the currency you look for, you may add one from Settings -> Available Currencies.
1.3.Customers
1.3.1.Add or edit a customer
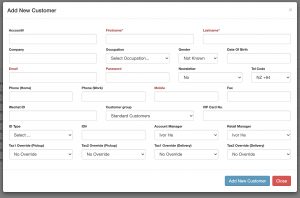
You may add a new customer from Customers -> List Customers -> Add New Customer.
Account#
Your own reference defined for the customer
First Name / Last Name / Company
Your customer’s names
Occupation / Gender / Date of birth
Basic information of your customer
Email
Contact email of your customer. Email will also be used for website logins.
Newsletter
If set to yes, the Mail Chimp CSV exported will include this customer.
Phone/Mobile/Fax Country Code
International country calling code
Phone (Home) / Phone (Work) / Mobile / Fax
Contact numbers of your customer. Mobile number will also be used for website logins.
Free shipping (1st order)
Whether this customer is allowed for first order free shipping, if first order free shipping if enabled from Shipping -> Free shipping eligibility.
Customer Group
The customer group the customer is assigned to.
VIP Card No.
The VIP Card assigned to this customer. You may search a customer by VIP Card number from the POS system.
ID Type / ID#
Customer’s ID details
Account Manager / Retail Sales Manager
The account manager or retail sales manager assigned to the customer. You may filter this record when retrieving sales report.
Agent
The agent who owns the account. If agent commission is set, the agent will earn the commission.
Agent Commission
Indicates whether or not agent commission is allowed for this customer.
Approval
If approval is set to ‘no’, the customer ma only place order through offline POS but not on the website. By default, customer is automatically approved as you create the account unless you wish to disapprove them.
Tax1/Tax2 Override (Pick up)
You may override the tax settings for pick-up orders for this customer account.
Tax1/Tax2 Override (Delivery)
You may override the tax settings for pick-up orders for this customer account.
Credit Limit
The account credit limit for on account customers.
Temporary Limit
The account temporary limit for account customers. Temporary limits will be reset on 1st of every month.
Invoice Due (days)
Default invoice due days.
1.3.2.Add or edit customer address
Customer addresses are used for order delivery or invoices.
You add or edit customer address from Customers -> List Customers -> select a customer to modify -> Address tab.
1.3.3.Cash Cusotmer
Cash customers are accounts used for cash sales (which are sales proceed without an actual customer account).
Normally you do not have to update Cash Customer account as it will be created when the store outlet is created. If you wish wish to update it, you can do so from Customers -> Cash Customers.
To update which store use such account, you can update it from Store -> Store Outlets.
1.4.Orders
1.4.1.Make a sale from POS
First of all, please ensure that you device (computer or tablet) has been assigned as a Cash Register.
If you are on a Super Admin role, you may add or assigned your device as a Cash Register from Settings -> Cash Registers -> Add Cash Register (or select an existing) -> click on the “SAVE & AUTHORISE” green bar to complete the device registration.
Once this step is completed, you may return to the Dashboard and click on the “Make a sale” button to start the POS system.
1.4.2.Create an order to customer account
On the POS system, firstly select or add a customer from the Customer section:
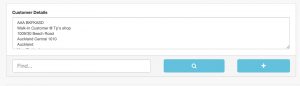
You may then add new customer details or select an existing customer account:
And then, you may select whether it is a Store Pick-up (yellow button) order or select or add an address to create a Delivery order.
1.4.3.How to process a delivery order
Once you have received an order from your website or other sales channels, you will need to process deliveries for these orders. On the Dashboard, you may scroll down to see the Orders Under Processing. Select the order that you wish to process for deliveries and click on the Ship icon ![]() .
.
On the order dispatch screen, please confirm your items and customer details and then scroll down to the page to either print the dispatch slip or start dispatching items.
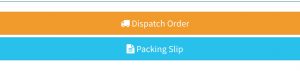
If you choose to Dispatch Order now, you will see the next screen asking you to select items in the package. If you ship all the goods in one package, you can then select all items:
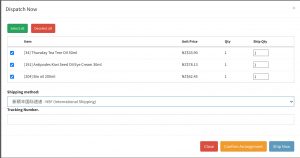
You may also choose the shipping method and enter the parcel track & trace number if you know them now. If you don’t, that’s OK, you have to chance to enter or re-confirm them again. Now click on Ship Now (blue button) to start dispatch items.
At the next screen, the system will ask you to scan in the item that you dispatch*:
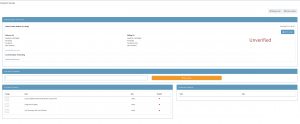
Once you’ve scanned in all the items, you should see the status from Unverified (red) changed to Verified (green).
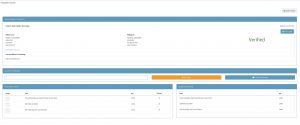
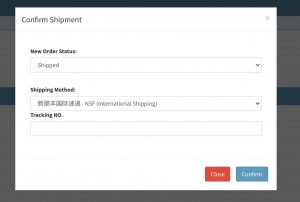
The final step is to confirm the shipment:
*If you do not wish scan the items before you dispatch them and if you have the Super Admin privilege, you may click on the right top “DISPATCH ALL” button.
1.4.4.How to refund a sale
To refund an existing sale, you must be able locate the sale first.
- To search an order, you may go to Orders -> Search Orders -> Enter order number or scan in the receipt number to search for an existing order.
- Once the searches is completed and then you may click on the order row to open the order details.
- On the order details page you may click on the Point of sale icon
 to start the POS system.
 - On the left product list screen, you may click on the item’s reverse icon
 to reverse the sale.
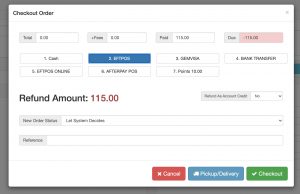
 - Click on $Pay button, and select a refund method, and then click on Checkout button to complete the refund.
1.5.Payments
1.5.1.Add or edit a payment method
You may add new payment method from Payments -> Payment methods -> Add new payment method.
Name
The payment method name you define to use in the system.
Payment module
The payment module you wish to use for this payment method.
Description
The payment method description used to display on the website (may vary according to different website templates).
Default POS method
Indicates whether or not this is the pre-selected payment method.
Use for website
Indicates whether or not the payment method is used for the website.
Point of sale – surcharge %
Indicate surcharge percentage for this payment method.
Merchant finance cost – interest %
This is the interest the merchant need to pay for a cost (for report statistics purpose only),
Sort order
The less the value is, the higher priority the payment method is.
Status
Setting this to “inactive” will disable the payment method.
Content Management – Payment message
This is the message to display if the payment method is selected on the payment.
1.5.2.Other currency payments
You may allow the POS system to receive currency other than the default currencies.
This is when the POS system is on the default currency and the customer wish to pay for the sale using a different currency. You may defined the Other payment currencies from Payments -> Other Currency Payments.
At the time, you checkout the order, you may then click on the little globe icon ![]() right next the payment amount.
right next the payment amount.
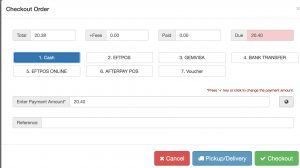
And then, you may select the currency and enter the amount to confirm payment.

1.6.Shipping
1.6.1.Add or edit a shipping method
You may add a shipping method from Shipping -> Shipping methods -> Add shipping method.
Section: Details
Shipping method name
The name you define for this shipping method
Shipping method code
The code you define for this shipping method. This is only important if you wish to use our APIs.
Shipping carrier
The shipping carrier who services the shipping method. The shipping carrier consist of the shipping carrier name, website, tracking URL etc that you may define from Shipping -> Shipping carriers.
Store outlets
The store outlet that allows for this shipping method.
Shipping Group
The shipping group that the shipping method belongs to.
Is free shipping allowed
If this is set to ‘no’, the shipping method will never be eligible free shipping. This will override the product free shipping settings.
Tax1 / Tax2 override
You may override force this shipping method taxable or taxfree.
Share across customer groups
If this is set “yes”, the shipping cost will be shared by all customer groups. Otherwise, you may set shipping cost based on different customer groups.
Allow to charge by percentage / Charge by percentage (%)
Indicates whether or not the shipping cost is added with a certain percentage based on the order total.
Sort Order
The less this value is, the higher the priority of the shipping method is.
Status
Setting this to “Inactive” will disable the shipping method.
Section: Shipping Routes
Shipping routes define how the shipping method displays.
“From Zone” means where the parcel is shipped from.
“To Zone” means where the parcel is shipped to.
When a parcel is shipped, the “from address” is defined by the store outlet’s address, and “to address” is received from customer order address. Only when “from address” and “to address” meets the conditions, the shipping method may be able to display.
Section: Pricing Table
This is pricing table for weight and volume you charge for your customers.
For example, 1kg / 0.1㎥ / $6 means you charge for $6 of a parcel less than 1kg and 0.1㎥ or below. If the weight or volume goes over either entry, it will follow at the next entry for example 2kg / 0.2㎥ / $12 and charge the customer for $12.
1.6.2.Free shipping
There are various method to enable free shipping for an order.
- To enable free shipping on an individual product, go to Products -> List Of Products -> Select a product to modify -> Shipping tab -> Update the free shipping option for the single product.
- To enable free shipping based on order total, go to Shipping -> Free Shipping Eligibility -> Enable free shipping based on amount -> choose Yes and then save.
- To enable free shipping for customer’s first order, go to Shipping -> Free Shipping Eligibility -> Enable free shipping based on amount -> choose Yes and then save.
2.Ivor ERP Membership System
If you have purchased and using Ivor ERP for businesses involved with membership purchase, membership usage counting, online booking, such as Yoga Class memberships, Gym memberships, Beauty membership, Ivor ERP Membership Version is the right choice for you.